As I mentioned in Chapter 1, I selected the Hayley bedding collection at Pottery Barn Kids for nugget’s crib. My wonderfully sweet friends Kristy, Laura and Lynette purchased the bedding for me as a shower gift. And this was no easy task since the bedding is still on backorder…and has been for months now. But when my friends set their minds to something they typically get what they want. And that’s how I ended up with the complete set before my due date. What else can I say except they are amazing friends and I love them dearly! xoxo
I wanted to incorporate more of the nature theme found in the bedding into other elements of the room. While searching one of my favorite websites etsy.com, I found a few stores selling tree decals that stick to the wall. I was instantly hooked and ordered my tree in white with pink birdies.
When my tree arrived, everyone told me there was only one person who could help me with sticking it to the wall – Keith’s grandpa Milo. He is the sweetest and most patient man around – two qualities that were definitely needed during the installation process.
The tree measures 48.5" x 80". Yeah, that’s kinda big so it’s a good thing that Milo is tall.
The hardest part was sticking the tree trunk and all the branches to the wall. First, we used tape to temporarily fix the pattern on the wall since there were numerous pieces. Then we had to peel off the backing sheet and use a credit card to rub over the transfer tape to make sure it sticks well onto the wall.
Once the pattern was secure, we carefully removed the clear application tape by pulling it in a downward motion.
There were a few instances when we got air bubbles in the decal, but smoothing it out with a credit card really helped.
It took more than 1.5 hours to install the tree and branches. After that point, I released Milo from his duties and worked on the leaves and birdies on my own. That took another 1.5 hours.
But all that time was well worth it in the end. It’s so flippin’ cute!!!!! (Note: I realize the white tree is slighly hard to see in the photos, but I promise it looks fab in person!)
And the red armchair in the photo was my grandma Toot's favorite chair. It’s super comfy and I love the idea of snuggling with nugget in Toot's old chair because it will be like she is there with us. I bought a slipcover to go over it since red isn’t really part of the nursery theme. I’ve never used a slipcover before so I’ll post an update on how that goes…I’m guessing it will be a humorous. Stay tuned!
Showing posts with label home. Show all posts
Monday, November 1, 2010
Chapter 18: Kitchen Renovation
Let the happy dance begin! This past weekend we had some helpers come into town to work on the house. The fabulous crew consisted of Keith’s grandpa, dad and brother. Let’s just say we got A LOT done...more than we even hoped to accomplish. Keith and I can’t thank them enough!!! xoxo
Project numero uno on our agenda was replacing the floor trim in the kitchen.
The old trim was plastic and got thrown away during the demolition phase. So Keith and I went to Home Depot and grabbed some new wood to match the trim in the rest of the house.
Keith’s brother Andy and grandpa Milo are experts at cutting precise lines with wood so we pretty much just left them alone to do what they do best.
Along with replacing the trim, we needed to also paint it with Glidden’s Dove White along with the chair rail, window frames, door frames and pocket doors.
One of the things I think is so cool about this happy house are the pocket doors. We have three total. Unfortunately, the previous homeowners did not use the pocket doors because the kitchen tile they installed blocked the doors shut. But now that the doors slide beautifully because of the hardwood, they needed a bit of TLC from us...with Walter supervising of course!
I swear the doors probably were white at one point, but 40+ years have passed and they kinda turned yellow. But nothing a little Dove White paint can’t fix. I envision myself using the pocket doors more frequently when I’m cooking dinner and the nugget is crawling around on the floor. I can simply shut the doors to keep her from roaming around the house without my watchful eye. Brilliant!
Project numero uno on our agenda was replacing the floor trim in the kitchen.
The old trim was plastic and got thrown away during the demolition phase. So Keith and I went to Home Depot and grabbed some new wood to match the trim in the rest of the house.
Keith’s brother Andy and grandpa Milo are experts at cutting precise lines with wood so we pretty much just left them alone to do what they do best.
Along with replacing the trim, we needed to also paint it with Glidden’s Dove White along with the chair rail, window frames, door frames and pocket doors.
One of the things I think is so cool about this happy house are the pocket doors. We have three total. Unfortunately, the previous homeowners did not use the pocket doors because the kitchen tile they installed blocked the doors shut. But now that the doors slide beautifully because of the hardwood, they needed a bit of TLC from us...with Walter supervising of course!
I swear the doors probably were white at one point, but 40+ years have passed and they kinda turned yellow. But nothing a little Dove White paint can’t fix. I envision myself using the pocket doors more frequently when I’m cooking dinner and the nugget is crawling around on the floor. I can simply shut the doors to keep her from roaming around the house without my watchful eye. Brilliant!
Like always, the Dove White paint really makes the wall color pop. We just need to spackle the nail holes in the floor trim followed by a little paint touch-up and we’ll be as good as gold. And we only painted one of the pocket doors – still have to two left to paint along with the door to the patio. Sigh! Painting is our lives.
Stay tuned… I need Keith to help me hang some items on the wall. Decorating is one of the best parts!
Chapter 17: Kitchen Renovation
After a long and arduous search, we finally found the perfect bar stools for our kitchen (insert sigh of relief)! I think we were both surprised by how expensive a bar stool costs. To us, something under $75 sounded reasonable. Ha! We quickly realized that might get us one bar stool at Ikea, but anywhere else we’d need to open our wallet and take out another Benjamin Franklin. So that was reality check #1.
Reality check #2 was the fact that I couldn’t find “inexpensive” white bar stools. I know, some of you might be thinking it’s weird that I would want white bar stools to go in my dark maple cabinet kitchen. But trust me, it can work! Pottery Barn and West Elm had some lovely selections, but the $200+ price tag for one bar stool was slightly ridiculous, in our opinion. We searched Target, Walmart, Garden Ridge, Billiard-type stores and even did some internet searching, but I just couldn’t find what I was looking for – at a good price.
So with two reality checks, I needed to rethink my vision. During a trip to Columbus, I dragged Keith into his first World Market store. Unfortunately, we don’t have any World Market stores in Pittsburgh and I had almost forgotten how much I love this place! And the best part of this trip was the fact that Keith really liked the store too…and that rarely happens! The second best part was the fact that we found bar stools – the Elana bar stool to be specific. I fell in love with the banana leaf fibers and how they were sorted from light to dark and then woven together to achieve an appealing herringbone pattern. It wasn’t white, but it was light and natural.
Only problem is that they didn’t carry the counter-depth height bar stools in the store – it was only available online. And while the price tag was right, we feared the bulk shipping prices would kill us. So we waited awhile to make a decision. As luck would have it, we got a special Friends and Family e-mail promotion a couple weeks later. The discount on the promotion would off-set the cost of the bulk shipping so we jumped on the opportunity and submitted our order.
And kudos to World Market for fast and efficient shipping. We placed the order on Friday before 5 p.m. and the bar stools arrived from California on Wednesday. Holy cow!
Besides looking fabulous in our kitchen, I adore these bar stools for being comfortable. We have a nice wide seat and high back for extra support. As an added bonus, I even think Nugget’s Fisher Price Space Saver High Chair will fit nicely on one of these stools.
The kitchen is getting very, very close to be done! We've been super busy the past couple weeks and I promise to share details soon!
Reality check #2 was the fact that I couldn’t find “inexpensive” white bar stools. I know, some of you might be thinking it’s weird that I would want white bar stools to go in my dark maple cabinet kitchen. But trust me, it can work! Pottery Barn and West Elm had some lovely selections, but the $200+ price tag for one bar stool was slightly ridiculous, in our opinion. We searched Target, Walmart, Garden Ridge, Billiard-type stores and even did some internet searching, but I just couldn’t find what I was looking for – at a good price.
So with two reality checks, I needed to rethink my vision. During a trip to Columbus, I dragged Keith into his first World Market store. Unfortunately, we don’t have any World Market stores in Pittsburgh and I had almost forgotten how much I love this place! And the best part of this trip was the fact that Keith really liked the store too…and that rarely happens! The second best part was the fact that we found bar stools – the Elana bar stool to be specific. I fell in love with the banana leaf fibers and how they were sorted from light to dark and then woven together to achieve an appealing herringbone pattern. It wasn’t white, but it was light and natural.
Only problem is that they didn’t carry the counter-depth height bar stools in the store – it was only available online. And while the price tag was right, we feared the bulk shipping prices would kill us. So we waited awhile to make a decision. As luck would have it, we got a special Friends and Family e-mail promotion a couple weeks later. The discount on the promotion would off-set the cost of the bulk shipping so we jumped on the opportunity and submitted our order.
And kudos to World Market for fast and efficient shipping. We placed the order on Friday before 5 p.m. and the bar stools arrived from California on Wednesday. Holy cow!
Besides looking fabulous in our kitchen, I adore these bar stools for being comfortable. We have a nice wide seat and high back for extra support. As an added bonus, I even think Nugget’s Fisher Price Space Saver High Chair will fit nicely on one of these stools.
The kitchen is getting very, very close to be done! We've been super busy the past couple weeks and I promise to share details soon!
Wednesday, October 20, 2010
Chapter 2: Creating A Nursery
With the realization that we had very few free weekends open before the nugget arrives, we decided to stay home two weekends ago (yes, I realize I'm behind with my posts). It turned into one of those nothing-special but because of that, so-very special weekends. I just loved the fact that it was just the two of us, running errands and putting items together for our daughter’s nursery.
Friday after work we headed to Ikea. My silly hubby thought we were only going to pick-up the Hemnes dresser and Billy bookcase. Then he remembered who he married and realized I had a few other items I wanted to purchase while we were there. Duh! :o) Extra items included storage containers, napkins, scissors, a trivet, a lamp, a few picture frames and a plant. I know – kinda random. But it was all either for the nursery or the kitchen.
After Ikea we headed to Babies R Us to purchase a shower gift for our friends Nick and Amanda. And right next to Babies R Us is a Half Priced Books and a Michaels. Our stop in Half Priced Books was rather short because they didn’t have a copy of “The Road To Wellville” by T.C. Boyle (the Newcomer’s Club October book selection that I’m not super trilled about reading). Then we had to run into Michaels so I could get scrapbook pages for the baby album I made for Nugget’s first year.
When Saturday morning arrived, I got us started off on the right foot by making some delicious pancakes topped with fresh strawberries and northeast Ohio maple syrup (the best there is)! I’m not sure if it was my yummy pancakes or the Buckeye music I had playing in the background that got us motivated to start putting together the Hemnes dresser.
While furniture assembly is normally a job that Keith completes solo, I decided to help. It was nice to tag team this project and spend time together in the nursery. It made me love the Havana Cream paint color I picked even more!
You can see how we utilized the crib to store the pieces and parts as we worked. This dresser truly is a perfect match to our crib so I'm pumped.
As you can see, the dresser is just the right size for a changing table on top. Exactly what we need! And that cute striped liner inside the drawers is yellow - how perfect is that?
And I know I’m going to appreciate the four mini drawers on top – I can have one for hair accessories, one of socks, one for first-aid items and one for diapers stuff...or something like that.
Ta-dah! Here's the finished product! And the cute lamp on top is one of the extra purchases at Ikea.
Friday after work we headed to Ikea. My silly hubby thought we were only going to pick-up the Hemnes dresser and Billy bookcase. Then he remembered who he married and realized I had a few other items I wanted to purchase while we were there. Duh! :o) Extra items included storage containers, napkins, scissors, a trivet, a lamp, a few picture frames and a plant. I know – kinda random. But it was all either for the nursery or the kitchen.
After Ikea we headed to Babies R Us to purchase a shower gift for our friends Nick and Amanda. And right next to Babies R Us is a Half Priced Books and a Michaels. Our stop in Half Priced Books was rather short because they didn’t have a copy of “The Road To Wellville” by T.C. Boyle (the Newcomer’s Club October book selection that I’m not super trilled about reading). Then we had to run into Michaels so I could get scrapbook pages for the baby album I made for Nugget’s first year.
When Saturday morning arrived, I got us started off on the right foot by making some delicious pancakes topped with fresh strawberries and northeast Ohio maple syrup (the best there is)! I’m not sure if it was my yummy pancakes or the Buckeye music I had playing in the background that got us motivated to start putting together the Hemnes dresser.
While furniture assembly is normally a job that Keith completes solo, I decided to help. It was nice to tag team this project and spend time together in the nursery. It made me love the Havana Cream paint color I picked even more!
You can see how we utilized the crib to store the pieces and parts as we worked. This dresser truly is a perfect match to our crib so I'm pumped.
If you ever purchase this dresser, make note that four hands are probably better than two hands. We had to rotate and turn the dresser on several occasions, which I think would be a difficult task for just one person.
As you can see, the dresser is just the right size for a changing table on top. Exactly what we need! And that cute striped liner inside the drawers is yellow - how perfect is that?
And I know I’m going to appreciate the four mini drawers on top – I can have one for hair accessories, one of socks, one for first-aid items and one for diapers stuff...or something like that.
Ta-dah! Here's the finished product! And the cute lamp on top is one of the extra purchases at Ikea.
It took us about 2.5 hours to put the dresser together…just in time to break for lunch and watch the Buckeye’s beat Indiana!
Still a lot more to do with the nursery and I'm 31 weeks pregnant. Yikes! More updates to come so stay tuned!
Monday, October 11, 2010
Chapter 16: Kitchen Renovation
Back with a kitchen renovation update! It’s been a little over a month since our installation was completed and I have to say we’ve thoroughly enjoyed every moment in our new kitchen. If we had a TV in here I really don’t think we’d ever leave the room. Ha ha!
Although, there are a few more things that still need to be done – like replacing trim, painting window frames and pocket doors, finding décor, etc. The plan is to complete this list of "to-do's" by the end of this month. But, I’ve also had to deal with this...
Yes, that’s a sad little light bulb hanging above our beautiful island. Cue the “wa wa wa” sound effect.
For the past month this pathetic light was a daily reminder that the fabulous pedant light I purchased online at Shades of Light was on backorder. Sigh! Being the planner that I am, I ordered the light on August 19 because I figured it would arrive at just about the same time the kitchen installation was wrapping-up. I was disappointed to get an e-mail reply that the light was on backorder until September 10. Slight bummer, but no big deal. However, September 10 came and went and I still had not received my light or even a shipment update. Double sigh! On September 16 I called customer service to check on the status and I was told that my light was still in production, but it was scheduled to be completed the following week. That got a triple sigh out of me because I realized the light would most likely be shipped the week we were at the Outer Banks. So imagine my annoyance when we got back from vacation and I still didn’t have my flippin’ light! This required another call to customer service on October 5. Luckily for me (and the customer service rep who didn’t have to experience the wrath of an emotional pregnant lady), my light had shipped out that very same day. FINALLY!
If the pedant light wasn’t so fabulous I might have cancelled the order altogether, but I hung in there. And it was worth it! The light arrived last Thursday and, of course, it was the first chore I made Keith complete on Thursday evening.
I have to say my hubby is one handy-dandy guy to have around. The installation instructions were not the best, but he figured it out.
I think I'll keep him around for awhile. :o)
Ta-da! I told you it was fabulous!
I just love the design of the pedant. It’s perfect for our kitchen. The soft gray lines pick-up the stainless steel appliances.
Shades of Light named this the “Trellis Linen Drum Shade Pendant,” but I think they should consider renaming it the “Becky Light” because it’s just my kind of style.
Stay tuned because we finally decided on barstools and they are expected to arrive later this week! Double yay!
Although, there are a few more things that still need to be done – like replacing trim, painting window frames and pocket doors, finding décor, etc. The plan is to complete this list of "to-do's" by the end of this month. But, I’ve also had to deal with this...
Yes, that’s a sad little light bulb hanging above our beautiful island. Cue the “wa wa wa” sound effect.
For the past month this pathetic light was a daily reminder that the fabulous pedant light I purchased online at Shades of Light was on backorder. Sigh! Being the planner that I am, I ordered the light on August 19 because I figured it would arrive at just about the same time the kitchen installation was wrapping-up. I was disappointed to get an e-mail reply that the light was on backorder until September 10. Slight bummer, but no big deal. However, September 10 came and went and I still had not received my light or even a shipment update. Double sigh! On September 16 I called customer service to check on the status and I was told that my light was still in production, but it was scheduled to be completed the following week. That got a triple sigh out of me because I realized the light would most likely be shipped the week we were at the Outer Banks. So imagine my annoyance when we got back from vacation and I still didn’t have my flippin’ light! This required another call to customer service on October 5. Luckily for me (and the customer service rep who didn’t have to experience the wrath of an emotional pregnant lady), my light had shipped out that very same day. FINALLY!
If the pedant light wasn’t so fabulous I might have cancelled the order altogether, but I hung in there. And it was worth it! The light arrived last Thursday and, of course, it was the first chore I made Keith complete on Thursday evening.
I have to say my hubby is one handy-dandy guy to have around. The installation instructions were not the best, but he figured it out.
I think I'll keep him around for awhile. :o)
Ta-da! I told you it was fabulous!
I just love the design of the pedant. It’s perfect for our kitchen. The soft gray lines pick-up the stainless steel appliances.
Shades of Light named this the “Trellis Linen Drum Shade Pendant,” but I think they should consider renaming it the “Becky Light” because it’s just my kind of style.
Stay tuned because we finally decided on barstools and they are expected to arrive later this week! Double yay!
Friday, September 10, 2010
Chapter 15: Kitchen Renovation
So this was probably the last major hurdle with the kitchen renovation. Painting. In my head I thought that the color we picked out for our bedroom – Glidden’s Barely Jade – would look great in the kitchen. However, after the granite got installed I realized that was totally not going to be the case. Our granite is so pretty that I really didn’t want a paint color to overshadow it. And even though Barely Jade is a soft shade of green/blue/gray, there are not colors like that in the granite to make it work as a good accent.
So it looks like we would have to go with a neutral color again. I’m starting to get concerned that I have a slight addiction to the color beige because I’ve pretty much covered most of the house in Glidden’s Water Chestnut, Antique Beige and Smooth Stone. Is there therapy for this? But as my mom and Keith pointed out, you can never go wrong with beige and it will allow me the creativity to change the room with décor whenever the mood strikes without the hassle of having to change the wall color. (Those two are so smart!)
So we tested Smooth Stone and Antique Beige on the walls before making a decision. Keith was rooting for Antique Beige because somehow we managed to have 1.5 gallons of this paint left over after we painted the hallways this shade. I was rooting for Smooth Stone because our dining room is this color and I thought it would be nice if the two rooms had some consistency. Plus, I was kind of envisioning the Antique Beige in our sunroom. But, I was not the winner in this situation. The Smooth Stone didn’t work with the granite either, but Antique Beige did.
I thought painting this room was going to be a huge pain because of having to tape all the cabinets and countertop, but it actually went really smoothly.
I will admit that Antique Beige looks better in person - these photos don't do it justice. Plus we still need to paint the trim with Glidden’s Dove White to make it pop. That will come soon though.
I really liked how it turned out. Light and refreshing like the rest of the house…or my vision for the rest of the house because we aren’t quite there yet. Lol
So it looks like we would have to go with a neutral color again. I’m starting to get concerned that I have a slight addiction to the color beige because I’ve pretty much covered most of the house in Glidden’s Water Chestnut, Antique Beige and Smooth Stone. Is there therapy for this? But as my mom and Keith pointed out, you can never go wrong with beige and it will allow me the creativity to change the room with décor whenever the mood strikes without the hassle of having to change the wall color. (Those two are so smart!)
So we tested Smooth Stone and Antique Beige on the walls before making a decision. Keith was rooting for Antique Beige because somehow we managed to have 1.5 gallons of this paint left over after we painted the hallways this shade. I was rooting for Smooth Stone because our dining room is this color and I thought it would be nice if the two rooms had some consistency. Plus, I was kind of envisioning the Antique Beige in our sunroom. But, I was not the winner in this situation. The Smooth Stone didn’t work with the granite either, but Antique Beige did.
I thought painting this room was going to be a huge pain because of having to tape all the cabinets and countertop, but it actually went really smoothly.
I will admit that Antique Beige looks better in person - these photos don't do it justice. Plus we still need to paint the trim with Glidden’s Dove White to make it pop. That will come soon though.
I really liked how it turned out. Light and refreshing like the rest of the house…or my vision for the rest of the house because we aren’t quite there yet. Lol
So while the walls are now painted, I don’t think you’ll get the full effect until after we install and paint the chair rail and floor trim, purchase the bar stools and assemble the décor on the walls and counters. Oh – and I’m still waiting on my pendant light to arrive for above the island. It’s on back order, but should arrive next week and I can’t wait!!!! And I did purchase some fun glass jars at Garden Ridge to store my flour and sugars. I love them too! There are a few other ideas I have for the counters and open shelf, but I just haven’t found what I’m looking for yet.
I’ll post new photos as we continue to make updates. Stay tuned!
Thursday, September 9, 2010
Chapter 1: Creating a Nursery
I simply could not wait to design a nursery for our little nugget! It probably is one of the best parts of being pregnant.
Keith was a little nervous…okay, maybe a lot nervous…when I started sending him countless ideas for the nursery via e-mail at work. I believe he even e-mailed my parents for advice on how to calm me down a bit! Ha!
To start the process, I decided to take the recommendation of various sources and pick out the nugget’s bedding first. That way, we’d have a color scheme to work around. I must have visited PotteryBarnKids.com, BabiesRUs.com and Target.com a few thousand times. There are so many choices that it can really be overwhelming.
To make things a little easier, I decided to make a list of things I knew I didn’t want for the nursery:
What I did fall in love with was the Hayley bedding collection at Pottery Barn Kids. I LOVE, LOVE, LOVE the trees, birdies and owls! Too adorable! Plus, it had a nice mix of pinks, blues, yellows, greens and purples in the bedding, which would allow me to have a wide option for paint color.
So we went to Home Depot and purchased about 5 different paint color samples to test on the walls. I highly recommend spending the extra $3 - $5 per test bottle to do this because it’s a huge disappointment after you’ve spent $50 painting entire room only to realize you don’t like the color you picked.
I was initially thinking of painting the walls lavender, but I couldn’t find a color that would really work with the bedding. On a whim, I picked two sample bottles of yellow while we were at Home Depot. I really loved the idea of having a happy yellow nursery, but yellow is notoriously a hard paint color to get right so I figured I wouldn’t like the two test bottles. Totally crazy, but lucky for me, Behr’s Havana Cream was PERFECT!!! It’s the most delicious shade of buttery yellow and it flows very nicely with the rest of the colors in the house.
Here is the before photo of the bedroom we picked for the nursery.
This room is straight down the hall from our bedroom. And since it's in the front part of the house, there is one of the cute dormer window nooks. This was also one of the two rooms in our house that wasn’t wallpapered so we were able to get started on painting it right away. Yay!
And here's the after photo with a fresh coat of Havana Cream. When Keith’s family came into town a few weeks ago his mom Brenda kindly agreed to help me paint and his grandma Helen agreed to supervise. I must say they were both excellent helpers and I think we did a fantastic job!
Keith was a little nervous…okay, maybe a lot nervous…when I started sending him countless ideas for the nursery via e-mail at work. I believe he even e-mailed my parents for advice on how to calm me down a bit! Ha!
To start the process, I decided to take the recommendation of various sources and pick out the nugget’s bedding first. That way, we’d have a color scheme to work around. I must have visited PotteryBarnKids.com, BabiesRUs.com and Target.com a few thousand times. There are so many choices that it can really be overwhelming.
To make things a little easier, I decided to make a list of things I knew I didn’t want for the nursery:
- Primary colors – I wanted to maintain a similar color scheme to what I created throughout the rest of our home and primary colors are not part of the mix.
- Pink overload – I love the color pink, but I knew I didn’t want that to be the only color in our nursery, even though we’re having a little girl and it's very easy to go pink crazy.
What I did fall in love with was the Hayley bedding collection at Pottery Barn Kids. I LOVE, LOVE, LOVE the trees, birdies and owls! Too adorable! Plus, it had a nice mix of pinks, blues, yellows, greens and purples in the bedding, which would allow me to have a wide option for paint color.
So we went to Home Depot and purchased about 5 different paint color samples to test on the walls. I highly recommend spending the extra $3 - $5 per test bottle to do this because it’s a huge disappointment after you’ve spent $50 painting entire room only to realize you don’t like the color you picked.
I was initially thinking of painting the walls lavender, but I couldn’t find a color that would really work with the bedding. On a whim, I picked two sample bottles of yellow while we were at Home Depot. I really loved the idea of having a happy yellow nursery, but yellow is notoriously a hard paint color to get right so I figured I wouldn’t like the two test bottles. Totally crazy, but lucky for me, Behr’s Havana Cream was PERFECT!!! It’s the most delicious shade of buttery yellow and it flows very nicely with the rest of the colors in the house.
Here is the before photo of the bedroom we picked for the nursery.
This room is straight down the hall from our bedroom. And since it's in the front part of the house, there is one of the cute dormer window nooks. This was also one of the two rooms in our house that wasn’t wallpapered so we were able to get started on painting it right away. Yay!
And here's the after photo with a fresh coat of Havana Cream. When Keith’s family came into town a few weeks ago his mom Brenda kindly agreed to help me paint and his grandma Helen agreed to supervise. I must say they were both excellent helpers and I think we did a fantastic job!
Isn't that just such a happy shade of yellow? It's so creamy and buttery that I'm starting to get a craving for some yummy mashed potatoes! lol
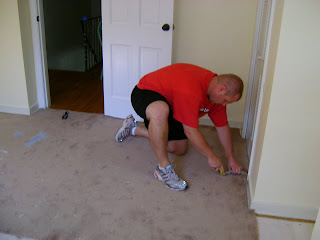
Then we...well, really Keith...had the fun task of removing the old carpet so we could expose our fab hardwood floors. After a little bit of elbow grease and some Rejuvenate floor cleaner, I really felt like the room kind of sparkled.
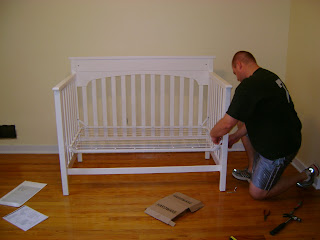
And what would a nursery be without a crib? We...well, that would be Keith again...managed to get that put together this past weekend without any trouble. We selected the Graco Lauren crib in white because it was a really good price and received high praise from my current bible – Baby Bargains. (Seriously, every soon-to-be mom needs this book!)
I forgot to take a photo of the crib completely put together, but it's so cute and since there is still plenty more things to do with the nursery, I’ll be posting more updates soon. And tomorrow I promise to post another update on the kitchen because we managed to agree on a paint color this past weekend and get that room painted. Stay tuned!
Tuesday, September 7, 2010
Chapter 14: Kitchen Renovation
Oh happy day! The granite for the kitchen arrived last Thursday! It felt like Christmas and because I was so excited, me and my belly even did a little happy dance for Keith. At least it got the hubby out the door for work with a laugh and a smile on his face. :o)
A nice perk of my job is that I have the flexibility to work from home one day at week. So it made our kitchen renovation process especially convenient because I simply arranged my schedule to work from home on the days the contractors had to be at the house. Although I have to admit it was rather difficult to work during the granite installation because they used some type of nasty smelling chemical which forced me to take my bump outside on the patio in the blazin’ 90 degree heat. Not fun, but well worth it in the end.
What do you think?
Of course, I was snapping pictures right away when they brought in the first piece!
The granite is a beautiful beige/grey/black/brown swirl of color. It truly is a perfect match with our dark stained maple cabinets.
And look at that perfect hole for my big, one bowl sink. Heaven!
When Keith came home is was especially pleased! Remember, this was his first time actually seeing the granite in person since he wasn’t with me when I went to pick it out. He knew I wanted a lighter countertop to balance the dark cabinets, but I think he had this slight fear that the granite was going to be super, super light – like almost white. (The guy still can’t forget that I painted one room in our old house bright orange so I think he’s waiting for my next big design screw-up.)
Sigh of happiness!
Now, I must admit that the day didn’t go entirely smooth. There was a brief 3 hours when I thought the granite wasn’t going to get installed. The installers thought one piece didn’t match and told me they had to take it all back. In my head I’m thinking, “You’re telling a pregnant woman what?” But the general manager wanted to come and inspect the situation and he was an hour away. I was slightly annoyed because he came and left fairly quickly without speaking to me about the problem. The next thing I know everything is fine and they are going to complete the job…huh?
Here’s where the pregnancy hormones kick-in. I kind of freaked out and told them they weren’t moving forward with anything until I had further explanations. So I made a few panic-stricken phone calls to poor Keith and Paul from Columbus Brother’s for help. I think the “I’m going to burst into tears at any moment” look on my face had the installers on edge so they called the general manager to come back to the house to actually talk to me about the situation in person. (why he didn’t talk to me in the first place is beyond me)
And what it all boiled down to was the fact that he’s the professional, the piece in question was completely fine, the installers should never have said anything to me – crazy pregnant woman – in the first place, and we’re good to go.
The next day, Joe, Jim, Jimmy and Paul came to the house to hang the glass cabinet doors, hook-up the plumbing and make a final inspection. They all agreed the granite was completely fine and the kitchen turned out beautifully. Reminded me once again why I love those guys!
So we still have a few tasks remaining before I consider the kitchen renovation done….painting, finding bar stools and decorating. But that will get done soon and I’ll post a few more updates so stay tuned!
A nice perk of my job is that I have the flexibility to work from home one day at week. So it made our kitchen renovation process especially convenient because I simply arranged my schedule to work from home on the days the contractors had to be at the house. Although I have to admit it was rather difficult to work during the granite installation because they used some type of nasty smelling chemical which forced me to take my bump outside on the patio in the blazin’ 90 degree heat. Not fun, but well worth it in the end.
What do you think?
Of course, I was snapping pictures right away when they brought in the first piece!
The granite is a beautiful beige/grey/black/brown swirl of color. It truly is a perfect match with our dark stained maple cabinets.
And look at that perfect hole for my big, one bowl sink. Heaven!
When Keith came home is was especially pleased! Remember, this was his first time actually seeing the granite in person since he wasn’t with me when I went to pick it out. He knew I wanted a lighter countertop to balance the dark cabinets, but I think he had this slight fear that the granite was going to be super, super light – like almost white. (The guy still can’t forget that I painted one room in our old house bright orange so I think he’s waiting for my next big design screw-up.)
Sigh of happiness!
Now, I must admit that the day didn’t go entirely smooth. There was a brief 3 hours when I thought the granite wasn’t going to get installed. The installers thought one piece didn’t match and told me they had to take it all back. In my head I’m thinking, “You’re telling a pregnant woman what?” But the general manager wanted to come and inspect the situation and he was an hour away. I was slightly annoyed because he came and left fairly quickly without speaking to me about the problem. The next thing I know everything is fine and they are going to complete the job…huh?
Here’s where the pregnancy hormones kick-in. I kind of freaked out and told them they weren’t moving forward with anything until I had further explanations. So I made a few panic-stricken phone calls to poor Keith and Paul from Columbus Brother’s for help. I think the “I’m going to burst into tears at any moment” look on my face had the installers on edge so they called the general manager to come back to the house to actually talk to me about the situation in person. (why he didn’t talk to me in the first place is beyond me)
And what it all boiled down to was the fact that he’s the professional, the piece in question was completely fine, the installers should never have said anything to me – crazy pregnant woman – in the first place, and we’re good to go.
The next day, Joe, Jim, Jimmy and Paul came to the house to hang the glass cabinet doors, hook-up the plumbing and make a final inspection. They all agreed the granite was completely fine and the kitchen turned out beautifully. Reminded me once again why I love those guys!
So we still have a few tasks remaining before I consider the kitchen renovation done….painting, finding bar stools and decorating. But that will get done soon and I’ll post a few more updates so stay tuned!
Friday, September 3, 2010
Bump Watch
Here is me and my belly at 24 weeks pregnant. Yup, I’m pretty much all belly at this point. I still can’t believe I’m more than halfway through my pregnancy. December 20th is going to be here before we know it. This stresses me out slightly because there is still so much to do around the house! Lol
But with the kitchen renovation coming to an end soon, Keith and I decided we just need to focus on preparing the nursery (I’ll have detail chapters on that soon), cleaning, organizing and maybe finally hanging up a few pictures on the walls. The sunroom, basement and two remaining bathrooms will just have to wait until next year…or the year after. Plus, let’s face it, I’m not going to be much help around the house my third trimester.
I’m actually looking forward to slowing down our pace for the rest of the year and just nesting. Anyone that knows me realizes I’ve got a mild case of OCD. I like my house to be clean and tidy at all times, but that’s something that’s completely not possible when you’re renovating. So for the past year, I’ve had to deal with the fact that at least 2-3 rooms in our house have been a total hot mess. So it will be nice to maybe just leave the basement as a hot mess, but get all the other rooms somewhat in order before the nugget arrives. Yay!
Keith and I are sticking around the Pitts this Labor Day weekend. The plan is to work on the house (we have a rather long “to-do” list), but we plan to also enjoy the long weekend and relax too. I’ll have photos of the kitchen next week so stay tuned and enjoy your weekend!
But with the kitchen renovation coming to an end soon, Keith and I decided we just need to focus on preparing the nursery (I’ll have detail chapters on that soon), cleaning, organizing and maybe finally hanging up a few pictures on the walls. The sunroom, basement and two remaining bathrooms will just have to wait until next year…or the year after. Plus, let’s face it, I’m not going to be much help around the house my third trimester.
I’m actually looking forward to slowing down our pace for the rest of the year and just nesting. Anyone that knows me realizes I’ve got a mild case of OCD. I like my house to be clean and tidy at all times, but that’s something that’s completely not possible when you’re renovating. So for the past year, I’ve had to deal with the fact that at least 2-3 rooms in our house have been a total hot mess. So it will be nice to maybe just leave the basement as a hot mess, but get all the other rooms somewhat in order before the nugget arrives. Yay!
Keith and I are sticking around the Pitts this Labor Day weekend. The plan is to work on the house (we have a rather long “to-do” list), but we plan to also enjoy the long weekend and relax too. I’ll have photos of the kitchen next week so stay tuned and enjoy your weekend!
Thursday, September 2, 2010
Chapter 5: 1/2 Bathroom Renovation
The time has come for the big ½ bathroom reveal! It’s the first room in our happy house that is officially complete. And I must say, I’m pretty pleased with the way it turned out. What do you think?
You can check out the before photo here to see how far we've come.
While I’m still super bummed that our gorgeous marble counter broke, I’m extremely happy with the granite we got from Home Depot. After we placed the order I was slightly worried I wouldn’t like it in the bathroom. But I love it! I think it looks great with the oil-rubbed bronze faucet and lighting we purchased at Lowe’s.
The Glidden Dove White paint on the vanity was just what the doctor ordered. It was easy to do and saved us some money from having to buy a new cabinet. At Home Depot I just found some cheap oil-rubbed bronze hardware for the drawers and the whole thing looked new again.
And we did have a tiny argument in regards to the placement of the mirror. Keith wanted to be lazy and just place it over the hole from the former medicine cabinet lighting fixture, but it was just too high from the counter top. So I made him fill in the hole so we can move it down to be more centered. Much better if I do say so myself! (Although I couldn't get a great angle on my camera to prove that to you.)
I used Glidden Smooth Stone paint on the walls and think it looks fab with the granite and dark fixtures.
As for the items on the counter, the little towel rack is something Keith picked out on clearance at Bed, Bath and Beyond. It’s rare, but Keith does occasional give input on how I decorate. :o) (But I secretly think he just liked the idea that it was one less thing he'd have to hang on the wall.)
The vase is a cheap-o find at Micheal’s that I had in our old 1/2 bathroom in Columbus.
I got the golf picture from AllPosters.com when Keith and I moved into our first apartment in Grandview, Ohio, after our engagement. (I miss that place!) Keith loves golf and I love the vintage 1920s fashion. So it was a win/win. And I think this is the perfect spot for the poster in our new home.
I still might need to find a small plant or something to put on top of the toilet tank, but that's minor.
So one room is off our checklist and only 14 more rooms to go! Lol Stay tuned because we are almost done with our kitchen renovation!
You can check out the before photo here to see how far we've come.
While I’m still super bummed that our gorgeous marble counter broke, I’m extremely happy with the granite we got from Home Depot. After we placed the order I was slightly worried I wouldn’t like it in the bathroom. But I love it! I think it looks great with the oil-rubbed bronze faucet and lighting we purchased at Lowe’s.
The Glidden Dove White paint on the vanity was just what the doctor ordered. It was easy to do and saved us some money from having to buy a new cabinet. At Home Depot I just found some cheap oil-rubbed bronze hardware for the drawers and the whole thing looked new again.
And we did have a tiny argument in regards to the placement of the mirror. Keith wanted to be lazy and just place it over the hole from the former medicine cabinet lighting fixture, but it was just too high from the counter top. So I made him fill in the hole so we can move it down to be more centered. Much better if I do say so myself! (Although I couldn't get a great angle on my camera to prove that to you.)
I used Glidden Smooth Stone paint on the walls and think it looks fab with the granite and dark fixtures.
As for the items on the counter, the little towel rack is something Keith picked out on clearance at Bed, Bath and Beyond. It’s rare, but Keith does occasional give input on how I decorate. :o) (But I secretly think he just liked the idea that it was one less thing he'd have to hang on the wall.)
The vase is a cheap-o find at Micheal’s that I had in our old 1/2 bathroom in Columbus.
I got the golf picture from AllPosters.com when Keith and I moved into our first apartment in Grandview, Ohio, after our engagement. (I miss that place!) Keith loves golf and I love the vintage 1920s fashion. So it was a win/win. And I think this is the perfect spot for the poster in our new home.
I still might need to find a small plant or something to put on top of the toilet tank, but that's minor.
So one room is off our checklist and only 14 more rooms to go! Lol Stay tuned because we are almost done with our kitchen renovation!
Tuesday, August 31, 2010
Chapter 4: 1/2 Bathroom Renovation
As I mentioned in Chapter 2 of the ½ Bathroom Renovation, we saved the vanity and marble countertop since both were in pretty good shape. The vanity just needed a couple fresh coats of Glidden’s Dove White semi-gloss paint, some new hardware and she’d be good as new again! And the marble countertop was simply stunning in my opinion. I was so happy we could keep these original elements from the home intact…or so I thought.
First, we had the fun challenge of trying to find a new white sink to replace the yucky original beige/tank sink. Of course the hole in the marble for the under mount sink was abnormally small that even a Lowe’s or Home Depot didn’t carry its size. Fortunately, Keith was successful in locating a random shop in Bridgeville that carried the size sink we needed. Whew!
So after I finished my one assignment out of this whole project (painting the vanity), Keith and Andy were ready to move it into the bathroom and secure the marble and sink on top. I happened to be productively watching some TV in the other room as they were doing this when I heard a loud CRASH!!!
I knew nothing good had happened so I just stayed put on the sofa and waited to hear the bad news that eventually would arrive. Yes, my lovely marble countertop broke in half. Definitely, the biggest disaster to happen in This Happy House to date.
Moment of silence please.
And with that, Keith and I ended up going to Home Depot and picked out a granite countertop for our vanity. And while I realize that granite is a completely wonderful option, I couldn’t help but be a little sad when we made the purchase. (I missed my marble!)
To add to the "luck" we were having with this project, the sink we already purchased was too small to reuse with the new granite so we had to buy another one. Ugh, a sting to the wallet since we couldn’t return the first sink after it was damaged when the marble broke. Sigh!
So basically, this whole ½ bathroom renovation wasn’t really going entirely as planned. I guess I should be thankful that this was the last bump in the road we hit during this project.
When the granite finally arrived I was happy - it looked great with the slate floor. And we all know that when mama’s happy, everyone is happy!
Stay tuned, I’ll make the big ½ bathroom reveal next!
First, we had the fun challenge of trying to find a new white sink to replace the yucky original beige/tank sink. Of course the hole in the marble for the under mount sink was abnormally small that even a Lowe’s or Home Depot didn’t carry its size. Fortunately, Keith was successful in locating a random shop in Bridgeville that carried the size sink we needed. Whew!
So after I finished my one assignment out of this whole project (painting the vanity), Keith and Andy were ready to move it into the bathroom and secure the marble and sink on top. I happened to be productively watching some TV in the other room as they were doing this when I heard a loud CRASH!!!
I knew nothing good had happened so I just stayed put on the sofa and waited to hear the bad news that eventually would arrive. Yes, my lovely marble countertop broke in half. Definitely, the biggest disaster to happen in This Happy House to date.
Moment of silence please.
And with that, Keith and I ended up going to Home Depot and picked out a granite countertop for our vanity. And while I realize that granite is a completely wonderful option, I couldn’t help but be a little sad when we made the purchase. (I missed my marble!)
To add to the "luck" we were having with this project, the sink we already purchased was too small to reuse with the new granite so we had to buy another one. Ugh, a sting to the wallet since we couldn’t return the first sink after it was damaged when the marble broke. Sigh!
So basically, this whole ½ bathroom renovation wasn’t really going entirely as planned. I guess I should be thankful that this was the last bump in the road we hit during this project.
When the granite finally arrived I was happy - it looked great with the slate floor. And we all know that when mama’s happy, everyone is happy!
Stay tuned, I’ll make the big ½ bathroom reveal next!
Chapter 3: 1/2 Bathroom Renovation
So while we’re waiting on the granite to arrive for the kitchen, let’s take a break and go back to our ½ bathroom renovation.
The reason for my delay in posting this specific renovation saga is because I actually had very little involvement in this project. Hence, I have no idea what the heck I’m talking about. But my sweet hubby keeps ignoring my requests for the gory details so I must simply move along without him and apologize for the poor and brief synopsis moving forward.
So basically I left off with a completely empty bathroom – all the tile removed from the floors and walls – and my vision for what I wanted the new bathroom to look like once completed. You can catch-up on this project by reading Chapters 1 and Chapters 2…posted oh so long ago!
Afterwards, Keith and his brother Andy purchasing some drywall to try and repair the areas where the wall tile use to be. Apparently this was a difficult process (but probably a good learning experience since we have two full baths to renovate next year) because we kept the top portion of the bathroom walls intact since they never contained tile.
In order to mesh the two walls evenly together, there was a lot of mudding and sanding, mudding and sanding…then more mudding and sanding involved. Quite frankly, it seemed like it took longer than it should have. In hindsight, I think Keith and Andy would agree it would have been easier to tear out all the walls completely and start fresh. Oh well. Live and learn.
Next, we needed to replace the floors. Keith and I found slate tile on clearance at Lowe’s that seemed to be a good fit with my vision and Keith’s budget. Win/win!
Slate doesn’t really create the clean lines and smooth texture of ceramic so looking back, it’s kind of an odd choice since I feel I’m generally more drawn to clean lines. But there was something about the raw and natural texture of the slate that appealed to my senses for the ½ bathroom.
It’s probably a good thing I got my slate tile installed because Keith and Andy swear they will never do it again. The slate was EXTREMELY messy to work with and the tiles kept breaking. I thought boys liked to get dirty so I didn’t see the big deal. :o)
In the end, I think they did a great job! Stay tuned to read about the biggest renovation disaster in This Happy House history to date!
The reason for my delay in posting this specific renovation saga is because I actually had very little involvement in this project. Hence, I have no idea what the heck I’m talking about. But my sweet hubby keeps ignoring my requests for the gory details so I must simply move along without him and apologize for the poor and brief synopsis moving forward.
So basically I left off with a completely empty bathroom – all the tile removed from the floors and walls – and my vision for what I wanted the new bathroom to look like once completed. You can catch-up on this project by reading Chapters 1 and Chapters 2…posted oh so long ago!
Afterwards, Keith and his brother Andy purchasing some drywall to try and repair the areas where the wall tile use to be. Apparently this was a difficult process (but probably a good learning experience since we have two full baths to renovate next year) because we kept the top portion of the bathroom walls intact since they never contained tile.
In order to mesh the two walls evenly together, there was a lot of mudding and sanding, mudding and sanding…then more mudding and sanding involved. Quite frankly, it seemed like it took longer than it should have. In hindsight, I think Keith and Andy would agree it would have been easier to tear out all the walls completely and start fresh. Oh well. Live and learn.
Next, we needed to replace the floors. Keith and I found slate tile on clearance at Lowe’s that seemed to be a good fit with my vision and Keith’s budget. Win/win!
Slate doesn’t really create the clean lines and smooth texture of ceramic so looking back, it’s kind of an odd choice since I feel I’m generally more drawn to clean lines. But there was something about the raw and natural texture of the slate that appealed to my senses for the ½ bathroom.
It’s probably a good thing I got my slate tile installed because Keith and Andy swear they will never do it again. The slate was EXTREMELY messy to work with and the tiles kept breaking. I thought boys liked to get dirty so I didn’t see the big deal. :o)
In the end, I think they did a great job! Stay tuned to read about the biggest renovation disaster in This Happy House history to date!
Subscribe to:
Posts (Atom)